This project wasn't really on my to do list, but last
Wednesday, when I dropped Sophie off at the day home she goes to one morning a
week, I realized that this was Sophie’s last day there. I had planned on buying
a sweet gift for the day home owner’s baby on the way, but my sick little baby
had kept me trapped at home for fear of dealing with unspeakable accidents in
public.
So, working with what I had on hand, I opted to give her a
Sweet Cherry Hybrid Tomato plant. I started several plants from seed in early
spring and ended up with more than I needed for our little family. Of course it needed a couple of personal touches for it to truly be a
special thank you gift. A little ribbon and handmade plant marker were just
what this occasion called for. Here's how I made the plant marker...
What you'll need:
Oven-Bake Clay
Rolling pin
Knife
Rubber stamps
Baking dish or pan
I used translucent Sculpey III Oven-Bake Clay. The translucent clay lets light through the thinner areas of the clay project, in this case the stamped lettering.
Directions:
Make a ball. Start by rolling a small amount of clay into a ball, about a 1 1/2" round ball should be enough to make this size of plant marker.
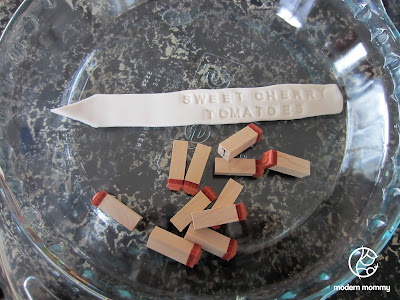
Shape the marker. Roll the ball into a clay snake to the desired length of your marker. Gently flatten the snake with your rolling pin so your marker is about 1/4" thick. Trim one end of the marker into a point with a smooth knife.
Stamp. Lay your marker in a baking dish or pan. Stamp the letters into the clay. I find it easier to start at the end and spell the words backwards so they go right to the end of the marker.
Bake. Bake the clay marker according to the package directions. The recommendation for this particular clay was to bake at 275 degrees Fahrenheit for 15 mins per 1/4" of thickness. If you baked it according to the directions and it still seems a bit floppy it should harden further as it cools.
The light will show through the stamped lettering if you used translucent clay and rolled it thin enough. You can use opaque and coloured clay for this project as well, but the light won't show through.
Happy Monday!


Nice bllog post
ReplyDelete